Off-Road Vehicle Recovery
High Lift Jack, Airbag and Snatch Reocvery
Contents
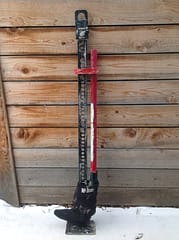
Jacks – The High Lift
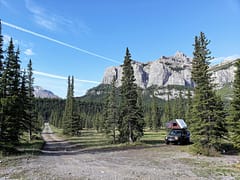
For Everyone and I do mean Everyone, who takes up Off-Roading and sits on the Loo reading their bundle of Off-Road magazines, contemplating and or dreaming of 4wd Adventures in wild places, the first set of photographs they browse usually shows some well equipped vehicle sporting a weird looking Red and Black thing with a long handle. It could be attached anywhere to the 4wd from the Bull Bars, Spare Wheel Carrier, or Roof Rack and mesmerised, the reader says to themselves, WOW! “That’s definitely a Must Have; if I own one of those and strap it on my truck folks will know I’m one of the Macho people who does all the Off-Road stuff.”
I just know that some of the old stagers are smiling and nodding in agreement at the last paragraph. Anyway, for the newbies, it’s called THE HIGHLIFT JACK. Lets term it the HL from now on.
Now, please note at this point: The Highlift Jack (HL) while being a great lifting device, it was not originally designed for we Off-Roaders. The general design was used as a Toe Jack for lifting heavy equipment, buildings, jack-leg cabins, etc. It’s often referred to as a Farm Jack. It IS a brilliant piece of kit. However, it also causes more accidents in vehicle recovery than most other items mainly through misuse and lack of knowledge by the operator. The HL in 4wd terms should ONLY be used for recovery and not for general jacking up purposes to work on your vehicle when repairing things. Main Tip: Keep the First Aid Kit handy - Wear Gloves during operating them and count your fingers before and after using them. OK, so far I have kept things light hearted but remember, when using any recovery equipment the stuff doesn’t usually just take prisoners, it can and does, hurt you if you do things incorrectly.
One of the first uses for the HL will be lifting your pride and joy out of a deep track rut when you have managed to belly out on the differentials or under body bash plates. Your vehicle will just be sat there and ALL your friends will be offering you advice (good and bad) on how to extract it. You WILL feel pressured especially if you’re a Newbie and this is your “First Time.”
You will unclip the HL from your truck and then start head scratching; “Where the hell do I stick it to lift the truck?” Unless you happen to have a special “hole” or “space” on your Bull Bar, Rear Bar or Side Bars, you will now be entering stage one of your First Aid Kit saga if you’re not careful. All the while your friends are adding to the pressure with their comments. Remember the 6P’s I mentioned earlier. Hopefully you have a fitment to suit, if not you are going to have to be really careful.
At this point, I am not going to waffle on more writing on techniques for using the HL, I am going to recommend that you watch this informative video by TGS as it covers most of what I would wish you tell you. Newbie or Old Hands, you can clap at the end of it but don’t spill your popcorn.
The HL cover most of the main points and you can see some of the dangers. Examples were done on dry flat surfaces and not in the field where the Mud/Snow/Sand will play a part.
There are one or two points that have been missed and I will explain those in the next paragraphs.
When lifting out of ruts, you will have seen you can lift off the front bar if you have the attachment and then carefully push sideways (keeping yourself out of harms way) and that allows the wheels to drop onto high ground outside the ruts. IT IS DANGEROUS and I recommend that you undertake Professional Instruction on the method rather than just watching a video.
Where possible, IF you have the short strop wheel lifting kit (shown in the first video) for your HL you are better lifting the vehicle with that system as it lifts the whole vehicle rather than just extending the suspension and body. This then allows you to place rocks or a traction aid or similar under the tyres to recover the situation.
One final point with the HL is that normally the one you buy is very long and difficult to stow in the vehicle. Some, like in the first video use a mounting kit off the spare wheel at the rear and usually the top of the HL rack and handle stands above the roof-line. The first time you hit a solid tree branch with it you are likely to at best damage the bracket and at worst the rear door of the vehicle. Consider that before you buy one or if needs be reduce the length by several inches to suit your application. Personally, I cut mine down when it first arrived and I store it in the rear of the vehicle rather than outside in the elements.
That said, I have owned my HL for more than twenty years. I did use it last century a couple of times to extract from deep ruts and I once changed a wheel using it. Since 1997, all my main vehicles have had both front and rear winches for extraction and I carry and use a compact two ton trolley jack on level ground for wheel changes. Also being aged, I carry a small hydraulic bottle jack BUT for some strange reason, I always stow the HL on board just in case.
Exhaust/Air Jacks
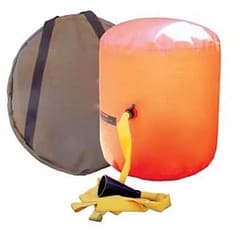
Not a new idea, but relatively new to the 4wd market are the Air Jacks. These are basically some form of strongly constructed, Nylon or composite Bag that has an input connection for either an air line inflation or which can be connected with a flexible hose to the vehicle’s exhaust using the exhaust gasses to inflate it. A great idea and used regularly by recovery agencies and the emergency services for lifting trucks and other vehicles following road accidents.
If you invest in this type of kit, buy a quality version and have the supplier or a professional trainer show you how it all works rather than just dragging it out of its new box and wrappings when your vehicle get stuck. Practise makes perfect. Make sure that the Hose connector for the exhaust system you have actually fits the exhaust as I have seen so many people get to that point and the connector doesn’t fit correctly so as soon as any pressure builds up it blows off. Some owners use a compressed air Scuba Air Tank (or Compressor) instead of the exhaust system.
One thing about Air Bag Jacks is they are vulnerable to punctures fromcprojections on the Chassis Rails and also, depending on the material they are constructed from they are not too partial to a hot exhaust so you need to protect them from these. Carry an old piece of carpet or use the vehicle’s foot-well rubber mat and it may save you the embarrassment. Basic operation is to find a suitable place under the side of the vehicle that has no projections, clear the ground below the area you are to place the Air Jack Bag, place your “protection” on top of the bag, open the connector pipe tap, couple up the exhaust connection, run the vehicle engine and watch the bag inflate and gently lift the vehicle to the required height. Shut the connector pipe Valve and stop the engine while you pack up under the wheels with suitable material to allow you to drive out from the obstacle. Disconnect the connector, release the air valve and deflate the Air Jack Bag. Then move it out of the way and hopefully you can drive out of the trouble. Brilliant to use them in the desert, or on sand generally. Saves all that hard work digging. Make sure you clean everything off afterwards and store away when dry.
Snatch Recovery
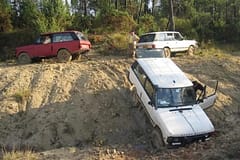
In “Club” situations sometimes “HASTE” and “EXCITEMENT” block the brain cells and Accidents are Just Waiting to Happen. Rather than a SLOW controlled Winch Extraction, here, the Red Range Rover is about to attempt a straight “TOW” of the White vehicle. Because of the “QUICK” decision, the angle of the extraction was likely to lead to the White Vehicle being pulled sideways across the 45 degree wet slope which would have incurred a likely Rollover, while at the same time leading to dragging the Red vehicle over the edge at the same time. Intervention and Common Sense prevailed for a safer result.
Maintaining the Song Themes, they suggest, “Suicide is Painless” in the “MASH 4077 Film.
Perhaps, they’ve never seen a Snatch Recovery Rope Incident go wrong!
So, what exactly is a “Snatch Recovery?”
In days gone by, and I suppose in most recovery situations even today, the majority have been or are carried out using a suitable length of decent thickness tow rope. Many of these will NOT have been “load” tested and therefore often they snapped at the critical point of a pull. The general idea was fasten the recovery vehicle to the one in need of recovery, tension the rope, drive the recovery vehicle forward steadily as required and as they say, “Bob’s your Uncle.” Or NOT! Sometimes, it’s necessary for a few attempts on these gentle pulls to obtain the required results. Gentle and Slow, were and are the operative words, that way, there are less chances of breakages or injury.
Then, THEN! Some bright spark remembered about that guy Newton and his “Third Law of Motion” (you may have noticed he keeps popping up in my articles). Basically, it states that every action has an opposite and equal reaction.
Add to that the introduction of strong Knicker Elastic, or if you wish to be more politically correct perhaps a “Rubber Band” and consider their elastic properties and you will have noted, that IF you stretch them, they return to their original length once they reach their maximum performance.
THIS is the basis of SNATCH RECOVERY.
Also remember, if they surpass their bounds of elasticity, the rubber band or elastic snaps and your knickers finish up around your ankles. Either way, it can cause either pain or be embarrassing, or both.
In the item on High Lift Jacks earlier, I mentioned they are dangerous if used incorrectly. They can reduce you finger count, break limbs and give you a nasty headache or worse. By comparison to the “Snatch Recovery Rope” they are what you could call “Aspirin and Sticking Plaster.” If you get things wrong with a Snatch Recovery Rope, it IS likely to Hurt You or any Bystanders, Damage the Vehicles and at the very worst it DOES, HAS and WILL KILL YOU!
Now, you may think I’m being over cautious, scaremongering, and generally over the top BUT let me assure you, I surely AM and it bothers me not. I have seen first hand the accidents and injuries, assisted the medics, consoled the friends and families when viewing the “Antics” and observing when things go badly wrong in situations with what some would call “Clubbies,” who were not prepared to listen. Listen, Learn or Ignore – Your Choice.
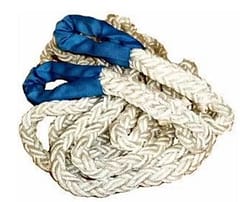
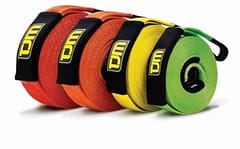
OK, let’s progress this. A Snatch Recovery Rope is a nylon rope that will be normally be 8m long and circa 25/35mm Diameter, with Rope eyes at both ends. Straps are often 9m x 75mm. Their typical breaking strain will be in the order of 9,000-12,000kg for a standard snatch rope. It pays to look after them as a nick in a strap or to just one the rope strands making them up can reduce their load capacity to 50%.
Snatch Recovery Rope
Snatch Recovery Tow Strap
Firstly, let’s give them their correct name – KERR - ‘KERR’ stands for ‘Kinetic Energy Recovery Rope’. (or KERS ‘Kinetic Energy Recovery Strap’)
Snatch recovery products differ from a normal tow recovery ropes because the connecting rope between the two vehicles is not tensioned prior to the recovery as in a normal tow recovery.
With the Snatch recovery, the bogged down vehicle is recovered by using another vehicle to pull the stuck vehicle free, but in this case the recovery vehicle is already moving. The recovery relies on the rope’s elastic properties. If carried out correctly, during the snatch recovery, the rope will stretch and elongate by roughly one metre as the towing vehicle drives forward. Once it reaches this maximum elongation, the Rope’s ‘Kinetic Energy’ reaction will be to return to it’s original length and as a result of this stored up ‘Energy’, after a slight delay, the bogged vehicle will suddenly lurch forwards with the retracting rope. Old Newton at his very best! – To Bystanders it appears to be Magic.
At this point I could go on and on writing on the basic techniques but I have found two videos that cover this. Please Note: there are many videos available that show poor techniques. These are some of the better instructional video examples. I would still recommend when you can that you take a lesson on the subject with a Professional 4wd Instructor rather than a “mate” at your local 4wd Club.
This first Video is worth a viewing and covers a Snatch Strap Recovery
This second Video covers a recovery using two joined straps
This third Video is of a test simulating what can happen when things go wrong. Consider the damage if the shackle had hit a vehicle windscreen or a bystander.
SAFETY SUMMARY:
First Watch the Videos:
- Always use suitable rated recovery equipment for the weight of vehicle to be recovered.
- Make sure that you have dug out in front of the bogged vehicle wheels so that their path is clear.
- SOME Light SUV and 4wd Vehicles do NOT have strong recovery points or front/rear bars. If so, they may NOT be suitable for a Snatch recovery.
- To reduce the load on the recovery points, where possible use a “Bridle” link to two adjacent recovery points.
- Only use Recovery Points that are specifically for that. DO NOT USE standard manufacturers “tie down” points used for shipping.
- Use a suitable “Winch Rope” style Sail a Metre in from each end of the Snatch Rope/Strap as this will stop it flying should something snap.
- Only attach the Snatch Rope/strap to a secure designated recovery point on the tow vehicle.
- DO NOT USE A STANDARD TOWBALL HITCH AS THIS WILL SNAP OFF AND CAN FLY LIKE A BULLET – IT WILL KILL ANYONE IT HITS OR SERIOUSLY DAMAGE OTHER VEHICLES.
- Once the recovery Snatch Rope/Strap is attached to both vehicles DO NOT WALK OVER IT.
- Ensure that both vehicles are directly in line with each other and that the snatch rope/strap is not at an angle at either end.
- The Snatch Rope/Strap will need to be set with an “S” loop in it to allow the Tow Vehicle to move off before tension is applied.
- Preferably have ONE PERSON in control of the Recovery as a Guide. It is usually the Tow Vehicle Driver in radio contact with the vehicle to be recovered but it could be a person outside the vehicles using a radio. It is most important that anyone outside the vehicles are well clear of any danger zones.
- When making the recovery, the Tow Vehicle only needs to use reasonable speed. Don’t go at it too fast or your WILL Damage something.
THE SNATCH
It is recommended that the towing vehicle should engage low range/diff-lock and drive off at a steady pace in 1 st or 2 nd gear.
The driver of the vehicle that is bogged down should have the engine idling in either 1st gear low range (or reverse, depending on the direction of tow). As soon as this driver feels his vehicle move forward as a result of the snatch, he should release the clutch and, gently drive out following the tow vehicle being careful not to drive over the snatch rope or strap.
Both vehicles should continue until on solid and stable ground before stopping to remove the equipment.
If the first attempt fails, then repeat the process but use a little more speed when setting off in the towing vehicle. If there is insufficient room, it may be possible to increase the amount of slackness in the snatch strap ”S” loop and attach two “Snatch” straps/ropes together by the correct method (you can see that in the video). Basically, you place one strap/rope through the eye of the other one and pull the rest of it through its own eye. When they are linked, you need to place a rolled up magazine or something similar between the loops so that when the snatch takes place, the link doesn’t tighten to the point you can’t undo it again. Don’t use anything too solid because if it flies out during the snatch it may damage something or someone.
ALWAYS USE SNATCH STRAPS/ROPES – DO NOT JOIN A SNATCH STRAP TO AN EXTENSION STRAP (which may not accept the loading imposed).
WARNING: Never join snatch straps together with a shackle as if either of the straps/ropes break, the shackle will turn into a projectile as you can see in the test demonstration video.
Re-Read the Articles & Re-Watch the Videos KEEP SAFE – SEE YOU ON THE TRACKS SOMEWHERE Winching Article to follow as it is a subject on its own
Previous Article: 4x4 a Water Crossing
Copyright
This content was prepared for the Off-Road Discovery Website by Xplorability 4wd Training
The Content - All Photographs and Photographic Copyright and All other Rights other Reserved October 2017. S.W. France. This content may not be copied or reproduced without the written consent of Paul Sinkinson – Xplorability Training.
For Use Only in 4wd and Light Vehicle Driver Training.
Not for Re-Publication, Distribution or use outside the Xplorability Training Programme